
Redmi came in with an aggressive stance when looking at the Redmi 8 lineup. The phone came in with multiple sub-models including the Redmi 8A. Redmi 8 saw the brand’s commitment to improving their budget lineup which helped them succeed.
Like our previous guides, in this one too we would guide you through the steps to install a custom recovery on your Poco X3 followed by getting Root access using the Magisk module.
Before we get into the flashing guide, let’s explore the device. The Redmi 8 borrows some of its look from the Redmi Note 8 series with a dual camera on the back and the large fingerprint reader underneath. This was the first phone in the budget Redmi lineup to feature a fingerprint sensor. The phone packs a large HD+ LCD panel upfront with a dew-drop notch housing the front camera.
It is powered by the Qualcomm Snapdragon 439 SoC which is a budget processor in the Snapdragon 400 series. The phone is sold in two color choices and three memory configurations. There is a dual rear camera module with the main sensor being 12MP which is assisted with a 2MP depth sensor.
Apart from this, we get the MIUI 11 based on Android 9. A large 5,000mAh battery is used to juice the phone which is fairly standard in the Redmi smartphone lineup these days. There is also support for dual 4G and MicroSD. Redmi has tried to let no stone unturned and has somewhat made a decent budget smartphone for the masses.
What is TWRP recovery?

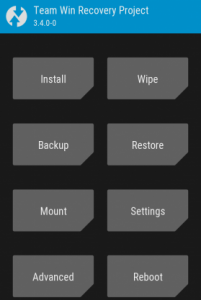
TWRP stands for TeamWin Recovery Project. It is an open-source and entirely GUI-based custom recovery for Android devices. The reason why it’s so popular is because of the fact that it allows Android users to enjoy fully touch-based UI and flash custom ROMs, MODs, Magisk, SuperSu, etc. There are further features like Full System backup that come in handy during these customization sessions.
EverythingXiaomi.com is not responsible for any kind of damage to data or devices while performing this task. Flashing a custom recovery voids the device’s warranty and might result in full data loss. You are proceeding at your own risk.
Install TWRP on Redmi 8
Before we start with the installation process, it is advised that you stick to the guide and follow the instructions line-by-line.
Pre-Requisites:
- Make sure the phone’s battery is charged above 60%.
- Back up your data on any external media or perform a Nandroid backup.
- Download ADB and Fastboot Drivers on the PC/Laptop.
- Download the latest Xiaomi USB Drivers on the PC
- Download and save twrp-3.4.0-1-olive.img it to the Extracted folder of ADB – Fastboot drivers.
- Unlocked Bootloader on the Redmi 8
Procedure to install TWRP on Redmi 8
- You first need to have an unlocked bootloader on your Redmi 8, so if that’s not done, follow our guide for the same.
- Connect your phone to PC and look if the OEM Unlock is turned on from the developer settings.
- Extract ADB and Fastboot drivers in a folder and open the cmd or PowerShell by pressing the Shift key + Right-Clicking in the same folder.
- Now type the following command [adb reboot bootloader] to reboot the Redmi 8 into the fastboot mode (Note: You might get a USB debugging permission on your smartphone, so accept the pop-up).
- Now place the twrp-3.4.0-0.img to the same folder where you have extracted the ADB & Fastboot drivers.
- Type this [fastboot flash recovery twrp-3.4.0-1-olive.img] command to flash the TWRP image you download.
- After the successful flashing, reboot the phone using the [fastboot reboot] command.
You have successfully installed TWRP Recovery on Redmi 8. The thing to note here is that this is an unofficial TWRP build made by individual developers and the build has not been vetted by the TWRP team. So you can get some bugs upon installing it, and it is advised to take a full backup just in case things go sideways. Let us now flash the Magisk module to get root access on the phone.
Procedure to root Redmi 8
Before we start this, make sure you download the latest version of Magisk from here and place the file on to the internal storage of your phone.

- Its always recommended that you take a full backup of the phone but if you’re doing this immediately after installing TWRP recovery, there is no need to make a separate backup.
- Now reboot your phone into TWRP recovery by pressing the volume up and power at the same while the phone is being turned on.
- Now, Select “Install” from the TWRP and browse for the Magisk.zip file. Tap on it to select it.
- Now, “Swipe to confirm flash” action.
- Upon successful installation, select “Install” once again and locate the “no-verity-force-encrypt.zip” file. Tap it to select it.
- Again “Swipe to confirm flash” action.
- Reboot System from TWRP Recovery.
- With the first boot, you might see a Magisk app on your phone, this is how you will be able to check the root status and download and install Magisk Modules for your Redmi 8.
- If everything checks out till now, you should have root access on your phone.
- Just to double-check, you could install the Root Checker app from the play store which should reflect the root status.
You have successfully flashed a custom recovery and root on your Redmi 8, and if everything is done correctly, this process won’t take much more than a couple of minutes.


Add Comment